Monday, November 28, 2016
Friday, March 25, 2016
C++ in modern times
I'm back in C++, and to my amaze C++ has become really productive and pleasant language to work with, I would say is as productive as JavaScript or Swift which are languages that are very important today but with the difference that it is backed by tens of years of optimisations at code generation level as well as performance. C++ is no longer this language that a lot of new people believe it as a memory leaking language, full of complex pointer arithmetic, with large template declarations which made the code verbose, etc. I would recommend that all new people using all those productive languages take a look to C++11/14 and the upcoming C++17 where the language has become quite pleasant to use, productive as JavaScript, Ruby, Swift and with amazing and unparalleled performance.
In addition to the features above, C++ believe it or not is cross-platform, you can for example in a mobile application whether it is in iOS or Android (assuming you are using MVC or MVVM), implement the Model on C++ and make it work on iOS and Android without modifications, so the soul of your app resides on fast and modern cross-platform C++ then you can glue your native UI to it using NDK on Android and Objective-C++ with wrappers on Swift on iOS, a simpler way to accomplish that is using this fabulous work from Dropbox guys
About 8 years ago I leave using C++ and move into Java not because I was a fan of Java but because the circumstances made me move into it. So before Java I worked for about 4 years on ACE (The Adaptive Communications Environment) and a lot of the stuff in that library did not exist on C++ nor in the standard library, things like tasks, IPC mechanisms like message queues, asynchronous I/O, networking objects like acceptors, connectors, time classes like chrono, etc. But now a lot of ACE is covered as part of the standard library on C++11/14 and on boost, so this is a simple example of how pleasant and simple C++ is today and how message queues can be used with a modern syntax:
#include <iostream>
#include <pplx/pplxtasks.h>
#include <boost/interprocess/ipc/message_queue.hpp>
#include <string>
using namespace std;
using namespace boost::interprocess;
int main(int argc, const char * argv[]) {
// max elements in queue
size_t const max_size = 100;
// remove the queue if already exists
message_queue::remove("the_queue");
// create the queue
message_queue mq(create_only, "the_queue", 100, max_size);
// create a consumer Task
auto t = pplx::create_task([]() -> int {
// execute the Task on a separate thread
try {
// queue's priority
unsigned int priority;
// it will hold the size of the data received on the queue
message_queue::size_type recvd_size;
// open the queue
message_queue mq(open_only, "the_queue");
while (1) {
// the queue holds messages of type string which will be hold on
// the "message" variable
string message;
message.resize(max_size);
// read from queue
mq.receive(&message[0], message.size(), recvd_size, priority);
message.resize(recvd_size);
// show message received
cout << "message received: " << message << endl;
if (message == "bye") {
break;
}
}
return 0;
}
catch(exception & e) {
cout << "exception: " << e.what() << endl;
}
return -1;
}).then([](int res) {
cout << "task completed with status: " << res << endl;
});
// here on the main Thread we read a message and publish it to the queue
string message;
while (1) {
cout << "message: ";
cin >> message;
mq.send(message.data(), message.size(), 0);
if (message == "bye") {
break;
}
cout << endl;
}
t.wait();
}
The sample code above uses PPLX which is a concurrency runtime in modern C++11 that implements the concept of Tasks and Continuations, if you are a C# developer you will find this very familiar. PPLX is contained on the fabulous C++ REST SDK library and sample code can be found here
The message_queue class allows not only inter-thread communication but inter-process communication and a lot more information about it can be found here
The following sample code shows a simple REST server using modern C++11 syntax and C++ REST SDK, a server that competes with a node.js REST server in terms of number of lines of code as well as productivity:
This is a version of the REST server in node.js that I took from node.js tutorial here
I hope this intrigues you a bit like to take a look to modern C++ and start using it on your current or next project.
The message_queue class allows not only inter-thread communication but inter-process communication and a lot more information about it can be found here
The following sample code shows a simple REST server using modern C++11 syntax and C++ REST SDK, a server that competes with a node.js REST server in terms of number of lines of code as well as productivity:
#include <ostream>
#include <cpprest/http_listener.h>
#include <cpprest/json.h>
using namespace std;
using namespace web;
using namespace http;
using namespace http::experimental::listener;
using namespace utility;
class RestServer {
http_listener _listener;
public:
RestServer(utility::string_t url) : _listener(url) {
_listener.support(methods::GET, bind(&RestServer::handleGet, this, placeholders::_1));
}
pplx::task<void> open() {
return _listener.open();
}
pplx::task<void> close() {
return _listener.close();
}
void handleGet(http_request request) {
json::value jsonRes;
request.extract_json().
then( [ &jsonRes ]( pplx::task<json::value> task ) {
const auto & jsonReq = task.get();
if (!jsonReq.is_null()) {
// do whatever you need with the JSON payload...
// now send response back ...
// now send response back ...
jsonRes = json::value::object();
jsonRes["response"] = json::value::string("Hello from modern C++");
}
}).wait();
request.reply(status_codes::OK, jsonRes);
}
static void run() {
auto rest = unique_ptr<RestServer>(new RestServer("http://localhost:8088/api/demo"));
restServer->open().wait();
cout << "Press ENTER to exit" << endl;
string line;
getline(cin, line);
rest->close().wait();
}
};
This is a version of the REST server in node.js that I took from node.js tutorial here
var express = require('express');
var app = express();
var fs = require("fs");

var user = {
   "user4" : {
      "name" : "mohit",
      "password" : "password4",
      "profession" : "teacher",
      "id": 4
   }
}

app.get('/addUser', function (req, res) {
   // First read existing users.
   fs.readFile( __dirname + "/" + "users.json", 'utf8', function (err, data) {
       data = JSON.parse( data );
       data["user4"] = user["user4"];
       console.log( data );
       res.end( JSON.stringify(data));
   });
})

var server = app.listen(8081, function () {

  var host = server.address().address
  var port = server.address().port
  console.log("Example app listening at http://%s:%s", host, port)
I hope this intrigues you a bit like to take a look to modern C++ and start using it on your current or next project.
Monday, January 12, 2015
A Pie Chart View Control for iOS

Objective
PieChart was concived after my learning of linear algebra's simple vectors arithmetic. I found interesting the idea to start practicing my reacent learning in an interactive Pie Chart control. This control so far is in its basic stage but can be used by anybody and extended to fit your needs. This is a work in progress and any feedback ideas or improvements will be greatly appreciated. The code can be found here.
How to use it
You need to include in your project the following files:- IMPieChartView.m
- IMPieChartView.h
- IMPieChartLayer.m
- IMPieChartLayer.h
- IMPieSliceDescriptor.m
- IMPieSliceDescriptor.h
- IMPieChartDecoratingView.m
- IMPieChartDecoratingView.h
- IMMacroToolbox.h
1) Then on your View Controller implement the protocols IMPieChartViewDelegate and IMPieChartViewDataSource
@interface IMPieChartViewController : UIViewController < IMPieChartViewDelegate, IMPieChartViewDataSource, IMPieChartDecoratingViewDelegate >
@property (nonatomic, strong) IBOutlet IMPieChartView * pieChartView;
@property (nonatomic, strong) IBOutlet IMPieChartDecoratingView * decoratingView;
3) declare a property of type UIImageView which will be used as the selector view, but here you can use any custom view you implement
@property (nonatomic, strong) UIImageView * selectorView;
4) Now on the viewDidLoad method you configure the pie using the following properties:
-(void)viewDidLoad {
// create the chart pie
self.pieChartView = [[IMPieChartView alloc] initWithFrame:CGRect(self.view.size.width, 0, 300, 300)];
// setup the delegate
self.pieChartView.pieChartDelegate = self;
// setup the datasource
self.pieChartView.pieChartDataSource = self;
// this will enable showing a drop shadow under the pie chart
self.pieChartView.enableShadow = YES;
// this is a factor applied to the radius so the drop shadow can be shown without clipping
self.pieChartView.radiusFactor = 0.9;
// you can specify the type of animation you want the pie perform when dragging ends
// or an slice is selected
self.pieChartView.animationType = IMPieChartAnimationTypeMechanicGear;
// you can locate the selection point in the top, left, right or bottom of the pie chart:
// - IMPieChartSelectionTypeTop
// - IMPieChartSelectionTypeBottom
// - IMPieChartSelectionTypeLeft
// - IMPieChartSelectionTypeRight
// - IMPieChartSelectionTypeTop
// - IMPieChartSelectionTypeBottom
// - IMPieChartSelectionTypeLeft
// - IMPieChartSelectionTypeRight
self.pieChartView.selectionType = IMPieChartSelectionTypeBottom;
// you can specify the animation type which could be one of the following
// - IMPieChartAnimationTypeBouncing
// - IMPieChartAnimationTypeMechanicGear
// - IMPieChartAnimationTypeBouncing
// - IMPieChartAnimationTypeMechanicGear
self.pieChartView.animationType = IMPieChartAnimationTypeBouncing;
...
}
self.decoratingView = [[IMPieChartDecoratingView alloc] initWithFrame:CGRectMake(0, 0, 300, 300)];
// The decorating view calculates the size of the selector view base on this is
// a percentage number of the size desired for the selector view.
// a percentage number of the size desired for the selector view.
self.decoratingView.sizingFactor = 0.16;
// this is the decorator's delegate which provide the selector view as well as the
// contained pie chart view
// contained pie chart view
self.decoratingView.decoratorDelegate = self;
// add decorator view to the view controller's root view
[self.view addSubview:self.pieChartDecoratingView];
6) Add the pieChartView to the decorating view:
[self.pieChartDecoratingView addSubview:self.pieChartView];
@property (nonatomic, strong) NSArray * data;
8) Now on your viewDidLoad method at the bottom after adding the pieChartView to the decoratingView, type the following:
self.data = @[[IMPieSliceDescriptor sliceWithCaption:@"Slice 1"
value:35
color:IMOpaqueHexColor(0xffd019)],
value:35
color:IMOpaqueHexColor(0xffd019)],
[IMPieSliceDescriptor sliceWithCaption:@"Slice 2"
value:29
color:IMOpaqueHexColor(0xff7619)],
value:29
color:IMOpaqueHexColor(0xff7619)],
[IMPieSliceDescriptor sliceWithCaption:@"Slice 3"
value:11
color:IMOpaqueHexColor(0x0066ff)],
value:11
color:IMOpaqueHexColor(0x0066ff)],
[IMPieSliceDescriptor sliceWithCaption:@"Slice 4"
value:10
color:IMOpaqueHexColor(0xff00cc)],
value:10
color:IMOpaqueHexColor(0xff00cc)],
[IMPieSliceDescriptor sliceWithCaption:@"Slice 5"
value:8
color:IMOpaqueHexColor(0xc60329)],
value:8
color:IMOpaqueHexColor(0xc60329)],
[IMPieSliceDescriptor sliceWithCaption:@"Slice 6"
value:7
color:IMOpaqueHexColor(0x9bd305)]];
value:7
color:IMOpaqueHexColor(0x9bd305)]];
NOTE:
IMOpaqueHexColor is a macro declared in IMMacroToolbox.h that is used to get some more interesting colors out from the ones that come in stock, and it uses as input the hex value of the color.
9) Now let's implement the pie chart's delegate methods as follows:
-(void)pieChart:(IMPieChartView *)pieChart didSelectSlice:(IMPieSliceDescriptor *)slice {
// Here you get the selected slice, which is the slice that passes
// through the selection point.
self.infoLabel.text = [NSString stringWithFormat:@"%@ - %@%%", slice.caption, slice.value];
}
-(void)pieChartIsReady:(IMPieChartView *)pieChart {
// Here you can perform some extra initialisation code whenever you load new data// this method will be called. In this case we are rotating to the first slice in
// the pie.
[pieChart rotateToSlice:0 animated:YES];
}
The macro im_log allows to print debug messages in the console, this macro is declared in the IMMacroToolbox.h and is available when the DEBUG global macro is defined. Basically when you are using the DEBUG scheme.
10) Now let's implement the data source methods as follows:
-(NSUInteger)pieChartSliceCount:(IMPieChartView *)pieChart {
// Here you provide the number of items in the data array.
return self.data.count;
}
-(IMPieSliceDescriptor *)pieChart:(IMPieChartView *)pieChart sliceForIndex:(NSInteger)index {
// Here you provide the slice descriptor for the index requested.
return self.data[index];
}
11) Finally let's implement the decorator's delegate methods:
-(UIView *)decoratorSelectorView {
return self.selectorView;
}
-(IMPieChartView *)decoratorPieChartView {
return self.pieChartView;
}
That's pretty much it.
Saturday, December 13, 2014
How to get rid of 'Failed to instantiate the default view controller for UIMainStoryboardFile...'
When I was trying to replace the default story board created in an single view project on Xcode I followed the steps below, but then I got the error message:
'Failed to instantiate the default view controller for UIMainStoryboardFile...'
So if you find this same error this is the way I solved it and the steps to replace the default story board.
To add a main story I need to follow this steps:
1) File > New > User Interface > Storyboard and call it “Newstory.storyboard"
2) Open Support Files / Info.plist
3) Search for "Main storyboard file base name” and replace the “Main” storyboard for the name of my newly added storyboard file “Newstory” without the .storyboard extension
4) Create a view controller and assign it to the story board’s view controller
5) Select the new storyboard and in the “Attributes inspector” make sure the “Is initial View Controller” is selected.
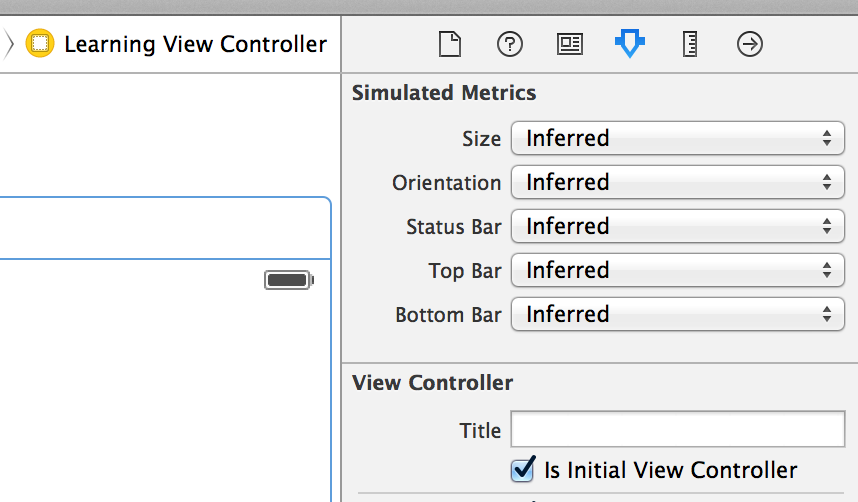
6) Build and you’ll probably see this error message:
Failed to instantiate the default view controller for UIMainStoryboardFile...
7) Just clean the build Shift + Command + K and re-build and the error should be gone.
Monday, August 11, 2014
Audeplayer now on the AppStore
My previously announced app called "music++" (since February of 2013) is now on the Apple AppStore under the name "Audeplayer" Check it out, currently is in its minimum viable product stage, so it will evolve into a much feature reach app that hopefully will find its way in the AppStore. If you download it and it happen to be of your satisfaction please give it a rate/review if possible, that'll help my app to bubble up from the waters of AppStore. :)
Saturday, February 23, 2013
music++ is coming to the App Store soon
This is an screenshot of my upcoming app, it will just simplify the music player experience.


Wednesday, March 28, 2012
CALayer Rotation in iOS

Basically to rotate a layer we have to perform the following steps:
1. Capture the touch and follow the finger through the screen
for that we create a UIView let's call it RotationView
//
// RotationView.h
@interface RotationView ()
{
GLKVector3 lastTouchVector_;
GLKVector3 originVector_;
}
- (GLKVector3) touchPointToVector:(CGPoint) point;
@end
Notice that we implement UIView's touch event methods to detect touches and to follow the finger through the screen
//
// RotationView.m
#import <QuartzCore/QuartzCore.h>
#import <GLKit/GLKMath.h>
#import "RotationView.h"
@implementation RotationView
- (id)initWithFrame:(CGRect)frame
{
self = [super initWithFrame:frame];
if (self)
{
CALayer * innerLayer = [CALayer layer];
innerLayer.frame = CGRectMake(0, (self.frame.size.height - self.frame.size.width) / 2.0f,
self.frame.size.width, self.frame.size.width);
innerLayer.contents = (id)[UIImage imageNamed:@"Image.png"].CGImage;
originVector_ = GLKVector3Make(innerLayer.position.x, innerLayer.position.y, 0.0f);
[self.layer addSublayer:innerLayer];
}
return self;
}
#pragma touch events
- (void) touchesBegan:(NSSet *)touches withEvent:(UIEvent *)event
{
UITouch * touch = [touches anyObject];
CGPoint touchPoint = [touch locationInView:self];
...
}
- (void) touchesMoved:(NSSet *)touches withEvent:(UIEvent *)event
{
UITouch * touch = [touches anyObject];
CGPoint touchPoint = [touch locationInView:self];
...
}
2. Calculate the angle between the current point and the last point
we need to convert the points into tree dimensional vectors (the reason for tree dimensional vectors is explained on point 3.) and translate the UIView origin to the center of innerLayer's so we will use the following code to accomplish that:
- (GLKVector3) touchPointToVector:(CGPoint)point
{
GLKVector3 touchVector = GLKVector3Make(point.x, point.y, 0.0f);
return GLKVector3Normalize(GLKVector3Subtract(touchVector, originVector_));
}
3. Calculate the rotation direction whether it is clockwise or counter clockwise.
The angle will be calculated using the result of subtracting the vectors currentTouchVector from lastTouchVector_ and using the length of the resulting vector as the displacement angle as in the following code:
- (CGFloat) calculateRotationAngle:(CGPoint) point
{
GLKVector3 currentTouchVector = [self touchPointToVector:point];
CGFloat rotationAngle = GLKVector3Length(GLKVector3Subtract(currentTouchVector, lastTouchVector_));
GLKVector3 crossProd = GLKVector3CrossProduct(currentTouchVector, lastTouchVector_);
CGFloat rotationDirection = crossProd.z > 0 ? -1 : 1;
lastTouchVector_ = currentTouchVector;
return rotationAngle * rotationDirection;
}
To keep always a circular path we normalized the resulting vector (take a look to the last line in point's 2. sample code) so it's length always is 1 ensuring the user's finger moves following the circular path we want.
Additionally notice that to calculate the direction of the rotation whether it is clockwise or counter clockwise we use the Cross Product of two tree dimensional vectors. This is the main reason to use tree dimensional vectors because a Cross Product only operates on them and to keep the code as homogeneous as possible by always using GLKVector3.
The Cross product's result is a perpendicular vector to the ones being multiplied and depending on the sign of the Z axis we can determine the rotation direction.
4. Apply rotation transform using the calculated angle which should consider the rotation direction.
We apply the rotation while the finger moves through the screen and in order to accomplish that we use the following code on UIView's touchesMove method:
- (void) touchesBegan:(NSSet *)touches withEvent:(UIEvent *)event
{
UITouch * touch = [touches anyObject];
CGPoint touchPoint = [touch locationInView:self];
assert([self.layer.sublayers count] == 1);
CALayer * innerLayer = [self.layer.sublayers objectAtIndex:0];
if ([innerLayer hitTest:touchPoint])
{
lastTouchVector_ = [self touchPointToVector:touchPoint];
}
}
- (void) touchesMoved:(NSSet *)touches withEvent:(UIEvent *)event
{
UITouch * touch = [touches anyObject];
CGPoint touchPoint = [touch locationInView:self];
assert([self.layer.sublayers count] == 1);
CALayer * innerLayer = [self.layer.sublayers objectAtIndex:0];
if ([innerLayer hitTest:touchPoint])
{
CATransform3D currentTransform = self.layer.sublayerTransform;
CGFloat rotationAngle = [self calculateRotationAngle:touchPoint];
self.layer.sublayerTransform = CATransform3DRotate(currentTransform, rotationAngle, 0, 0, 1);
}
}
this way is a simple algorithm to accomplish rotation of a CALayer while following the finger on the screen describing a circular path.
You can find the code here... Enjoy!
You can find the code here... Enjoy!
Subscribe to:
Comments (Atom)